 Because I think that the price of a solar panel is still pretty high(in Europe), and because the stimulation from our government (in the Netherlands) is not so good (very,very complicated and time consuming) I started the project of building my own solar panel. I would like to invite anyone who has some experience with this or is interested in it ,to give me any advice or remarks about it. The main challenge is to build a panel that can withstand heat, cold, rain and hail for many years.
Buying My First Solar Cells
In October 2008 I bought my first 100 cells via Ebay. But as I later learned, they were still very expensive: 300 Euros for 100 cells, including shipping. I was told they should produce 1,98 Watt each. Below a picture :

The First Solar Cells
After some experimenting and very long brainstorming about how to continue, I found another seller on Ebay who had the same cells (of which he gave the specification that they were 1,75 Wp each……) But these were slightly damaged. Well I decided to buy 500 cells ,a mix of 3 different qualities. The seller had not counted these cells but there were 620 cells, of which after a first selection , just over 500 were reasonably good. Not a bad deal to start with. And a lot cheaper! Also now I had over 100 cells for practice on soldering and handling.

The 620 Cells.
Building the First Small Panel.
Well I got started. Beginning with the soldering-technique, that takes some practice, but after a while you get the hang of it. And now my first small experimental panel is ready! The main focus and moreover challenge is to get the cells 100% sealed: air and water tight. The cheapest solution for me is to make a double-glass construction. And the cells in between the 2 plates of glass. The panel is made of 12 cells, each 0.55 Volts. On the picture below you can see many purple coloured wires. Those wires are each connected in between each cell so afterwards I can still do some measurements to compare each separate cell.
My First Do-it-yourself Solar Panel
The First Measurements in the Sun
I must say that at first I was worried whether I would see the cells really produce the power they should. But after building a variable resistance (making it possible for me to roughly find the maximum power point) the sun at last was shining (not much sunshine here beginning of February) and I got my first real measurement : 15,5 Watt. According to the specifications the panel should give a maximum of 12 x 1,75 W = 21 Wp. Given the fact that the glass takes away about 10% of the power,without the glass it would have been about 17 Watt. I expect that during summer as the sun rises much higher above the horizon, the measurement will give higher readings , thus coming closer to the specifications…. I am using normal 4 mm (0.16 inch) glass because it costs me nothing. If you just look around near places were they renovate old houses you can get the old glass for free…… This compared to the real stuff they use for solarpanels which is quite expensive and probably very difficult to find.
Influence of Heating the Panel in the Sun.
During the first measurements, I found that the heating up of the panel was pretty strong. But this especially was the case for the backside. were the cells are glued upon (using the same kit I used for glueing and sealing the panel). This panel is 12 mm (0.47 inch) thick : 2 plates of glass each 4 mm (0.16 inch) and 4 mm in between. What troubles me is the temperature-difference between the front and backplate of glass. This will result in different expansions creating stress on the sealing,if that is repeated too often it will start leaking. Now I am using the same kit as is being used in solar panel factories. But it still worries me. A solution can be to keep the panels small, so the difference in expansion stays minimal.
Improvements
A solution to the temperature-problem can also be to make the gap between the 2 plates of glass smaller. So the heat will be more evenly dissipated to both the front and backside ( thereby also creating more cooling capacity). My next panel (picture below) is the same size,the difference is the distance between the 2 plates of glass : it is now 1.5 mm (0.059 inch) …..and this also makes the sealing a lot easier and thereby better. I have used pieces of copper winding wire that I happened to have : 1.2 mm (0.047 inch) thick. I took several pieces of about 3 cm and spread them evenly along the side on the glass backplate. Then the kit along them all around the full edge. And finally pressed the front plate on it. The result is a gap between the plates somewhere between 1.2 mm and 1.5 mm. So on the inside, there is some trapped air (with, of course, a certain amount of humidity in it), which can potentially cause condensation. But my hope is that the amount of that is so small (only very small amount of air……) that it will not be a factor…… ( In the first panel I did put some stuff that can “eat” the condensation. I got this out of old double glass that I separated,the stuff is inside the aluminium strips between the double glass edges)

The Improved Panel
The kit will have to dry for a few days, but anyhow the weather forecast does not indicate any sunshine the coming days………
First Results
Bottom line is that if the output of each cell really hits 1,75 Wp then I can come to a price of Euro 1,20 per Wp (or even lower than that….) And with such a price the panel will not have to last for 20 years……..but off course that is my aim ! That will be the main challenge ! But I must say with this second panel my hopes are getting higher.
You can find more (and more up to date) information on my website
Well, who feels like building panels also ? Or give me some advice, or share experience. I do not mind getting negative critics because they might be correct………and they are there to be solved !
Next Phase
Update: 15 februari 2010:
The first systeem of 400Wp is now fully functional and produced it’s first electricity. The cost price is now around $1.68 per Wp and is expected to drop to $1.10. More information about the next phase in the project can be read in the article DIY Built Solarpanel Installation Now Operational.
Lamp Portal


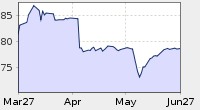
Oil Price
WTI Crude Oil

171 replies on “Building my own Solar Panel”
I have read this thread and want to commend Chris for getting off the couch and “Just Doing It”!!!
As for all the concerns – blah blah…
Sure his panel would be more weather resistant and have more strength with a tyvek backing and cells sandwiched between EVA Sheets (what is EVA?, eMail me and I will gladly fill you in) It is the primary encapsulant for a solar cell panel). Yes the wiring has some unwanted resistamce and he should have used tabbing wire to connect the cells into a string, and buss ribbon wire to interconnect the whole thing to the panel terminals. Blocking diodes would help to eliminate reverse battery drain on a dark/stormy night, and help control cell current runaway (sorry maybe a bit too technical).
..
The overall point in this person’s project is being over looked by a majority here – He took a stance, acted, and built a working solar panel!!! How many have all of you built?
..
The posts about the 200ma (that equates to .2 Amps for the uninitiated) cells costing 1.00 each is not encouraging. With a nominal cell voltage of about 0.55V and .2Amps (best case) you would only have a 9 watt solar panel. Want me to do the math: Take 36-cells (most panels are 36-cell panels), at .55V each = 19.8 Volts. Add a blocking diode (this allows you to parallel panels without interaction or im-ballance due to varying operational characteristics – oops, getting too technical again), you will have to subtract .8Volts (a 60PIV Silicon Diode will result in around -1.7V – a shottky diode will result in only about .7V drop accross the diode, but then will cost five times more than plain ole silicon). Now you have 18.1 V to 19.1 VDC at 200 mA ( essentially 18VDC at .2 Amps) – hence 9 watts. Simple math P (watts) = V (volts) x I (current – aamps).
..
So, if you spend say $4.50 to $6.50 per cell you can get cells with a current rating in the range of 4A to 7A (that’s 4,000mA to 7,000mA!).
…
You still need to weather proof the cells (the pros use EVA and a vacuum laminator, the semi-pros use a hair drier or heat gun and gravity.
..
Hint: RV solar cells use a plate of plain tempered glass on top and another on the bottom. Throw in a rubber gasket around the edges between the glass and you have a seal – dah…. How do you bolt it together – with an aluminum or plastic frame and bolts!!!
…
Life expectancy of any solar cell exceeds 25-years, unless you leave them open to the weather. We have six panels that are over 20-years old. They are in Arizona, Georgia and Tennessee (we have two panels with no weather proofing at a site in Georgia (Valdosta to be exact), two in Tennessee (SW of Nashville) and two in Arizona. The ones in Georgia and Tennessee only requires maintenance periodically to deal with moisture issues and are operating at 65-70%% of original capacity. oh yea – they are made with .54V 3,400mA cells – state of the art , the ones in Arizona get literally no maintenance and are operating at 85% of their original capacity. Point is weather seal is in fact important – but not that difficult to achieve.
…
We also have prototype panels that have operated in the open environment subject to wind, rain (we don’t get a lot in Arizona but the gang’s in Georgia and Tennessee have their own life vests -0 or at least the quack a lot when we IM and video conference together.
…
I encourage all of you to get on the stick and build your own panels. To heck with the so called incentives – just run your TV and refridgerator (or even you alarm clock) – with the power from your panels. You will be doing your own part to participate in this wonder full thing called “Green Living”.
…
Think they are too big for your roof (we have built them with 7″ wide by 96″ long geometry. You are only limited by your ingenuity – just go for it.
..
Chris – Well Done! Bravo!!!!!
..
Dave R. Mason
Southwestern Solar
and
Arizona Bio Fuels Research
Phoenix, Arizona, USA
email: dmason@phoenixcomputerlabs.com
or: swsolar@phoenixcomputerlabs.com
..
Hello Dave (I allready mailed you personally)
This is really great that you give me this support !
Really ! Thank you very much !
Indeed the essence of what I am doing is to stimulate others !
And I really like what you are saying about the experience you have with your own panels.
Untill today I have not used diodes,simply because there is no need (yet) to parallel panels. But since writing the articles I also have moved forward : I now have been able to feedback power into the grid ! I made a 36 cell panel and combined that in series with my first 2 panels of 12 cells.So I got 60 cells in total giving almost 34 volts. I bought a secondhand small only 95 Watt inverter(OK4E, inputrange about 20 – 50 Volts) and I fed the output of my panels into it. I plugged the inverter via a power-meter into a wallsocket of my house and voila : 68 watt into the grid ! I almost jumped for joy ! I almost finished my next 36 cell panel.
I have another project : I found a real good technician who these weeks is working on repairing secondhand gridtied inverters (he and I bought 5 of them all the same ones)if those repairs work out as he and I hope ,I might have inverters that cost me only 22 Eurocents per Watt.Now compare that to a new inverter. I have been told by several technicians that inverters can last very,very long but they will fail at some time in the future.But allmost allways it is possible to repair it. I foresee a market whereby a slowly increasing number of hobbying technicians will offer their services for much lower prices than for instance sending the inverter back to the factory…..
Well soon I hope to have the time to write an update to my article……
Chris ,
Oh ,here is the company where I buy my cells : Everbright Solar, its in Fremont near San Francisco.They are also on ebay .There the sellers name is “RebeccaYi”. And they send free to allmost all States in the USA.
(tell them how you found them ,that would be nice….)
Great job!
I’d like to examine the possibility to implement sunpanels into houses before construction(so you dont have to buy roof-tiles). Btw, do you know where i can buy similar solar models as yours? I couldnt find any on Ebay…
Hello Thijs,
Did you look at http://stores.shop.ebay.com/Everbright-Solar-Inc__W0QQ_armrsZ1 . Its at ebay.COM…..
Look also at : http://link.marktplaats.nl/242902558 (its mine, lower price when more than 20….)
Chris
I had an idea for making the panels. Could you spray the front of the cells with clear polyurethane, then just stick them all onto the glass? Wire them up after they dry. Glue a small border around all the back edges of the glass (probably should do this before sticking the solar cells on). Pour a can of polyurethane over the back. The border will hold it in ’till it dries. I think this will also make the glass less prone to hail/impact damage, plus no where for a lot of heat to build up. You could then silicone around all the borders and stick it onto a board (or anything really) that is slightly larger than the glass. You could then mount the panel by using screws through the board…
Oh yeah, this would also be moisture proof! Now I want to build one! Here’s a link on ebay if anyone is looking for solar cells…
http://cgi.ebay.com/ws/eBayISAPI.dll?ViewItem&item=110371347510&category=41981&_trksid=p3907.m263&_trkparms=algo%3DSIC%26its%3DI%252BC%26itu%3DUA%252BIA%252BUCI%26otn%3D15%26po%3DLVI%26ps%3D54
You guys Rock!! Chris great job…And Dave R Mason you’re absolutely rock!!
Hi Phil,
I think your idea is good. But some remarks :
You should first solder the strings of cells together, because if you would do it after it is “glued” to the glas, you would heat up the glas to much and it would almost certainly break !
Second remark : try to figure out how much it would cost per Watt.Also the board that you have in mind,how weather resistant would that be ?
I am trying to balance the cost of it all versus the durability and the output in watts…..
Third : I am busy finding, not to expensive ,tempered glas that they use for greenhouses(in holland we have lots of those…) About 98% of the sunrays pass through it compared to (a very rough measurement of me) about 87 % of the free glas I have used so far.The price is about E 18,00 per sqm (about $ 24.00/sqm)
Then this ebay link that you give is sold out, but they have much much more. I have been in their warehouse(Fremont /San Francisco) were they have more than 100.000 cells. So this ebayseller RebeccaYi is were I have bought my cells.I buy the slightly damaged ones….
Very friendly people ! I can recommend them !They ship for free all over the USA (including Hawai and Alaska) Just send them a mail,telling what you want.(mentioning my name will probably help…..)
And Gdife : Thank you !!!
By the way, my technician has got the first one of the five inverters working ………
Chris
Hi,
Great article. Main problem is heating in situ – the greenhouse effect with the glass. Heat seriously reduces electricity generation as well as stressing the assembly. Maybe some kind of heat sinking is necessary. Say bond to an aluminum plate, or aerated hollow box.
ank
I header the US goverment is gonna install solar panels in the white house but not spread them over the Sahara to provide energy for the rest of the country. should be ashamed.
Chris I am glad to see you keep up with your thread. I have an idea for you. I purchased the same cells from RebeccaYi. I payed a little over $1 per watt for the cells.
OK, here is my idea. This is what I am trying for panels I am building right now. I bought industrial laminating sheet, 0.01″ thick. Here is my plan. Place the soldered strings of cells face down on a piece of glass. I cut a sheet of laminate the size of the glass, and build another bag of laminate and duct tape that I can create a vacuum in. I have a small industrial food processor vacuum pump. I’m pushing it on the duty cycle, but it works. So I have the glass, cells, and sheet laminate in the lamiate bag, under vacuum. While under vacuum, I have been using a heatgun to seal the plastic laminate. So the back of the panel is double layer of laminate, and paper(so you cant see through), sandwhiching the cells to the glass.
I havent tried it yet, but this is my plan. I originally built two panels on peg board, and I siliconed them, so they wont come off. I did laminate those two panels. I am worried because laminate is covering the front of the cells vs glass. I don’t know the amount of light the plastic will let through, and I’m worried about long term durability in the sun.
My only concern with the laminate on the glass panels will be the durability of the adhesive on the laminate. I have to build a couple layers of laminate on the edge of glass to bring the thickness to .25″, the glass is 0.188″, so it will fit in a standard frame. I think if I silicone the edges in the frame, it should hold the laminate securely on the glass, and nothing should be allowed to enter.
Hi Chris> I think is the best Idea work with natural force,
like sun power, I am just starting with a Photo Cells Project, I want to reduce my electrical bill, If you can share some information about it, send me the information at wuelman@yahoo.com
Best Regards
WM
For anyone interested in learning more about how to build their own solar panel, I highly recommend the video and manual course here: http://budurl.com/mjqq.
There are step by step instructions with clear illustrations to build solar panels and even wind power generators. The author did a great job of making this very easy to follow. You should definitely check it out if you want to save money on your electricity bill: http://budurl.com/mjqq
Hello Dingo,
Sorry for the late reaction .
I am very interested in your results with the eva and the way to make the vacuum. My worry would be that if you make the vacuum too strong ,the cells might break under the pressure. Because after soldering the cells cannot be complete flat against the glass as the cellwire + (most probably) some solder will be in the way. I hope I make myself clear . So please let me know how you are doing. One more thing that I am concerned with is the strenght of the glass : I will change to tempered glas(for the frontplate)and it is a type of glass that they use in greenhouses(I still have to test that regarding the amount of sunlight it lets through)of 3mm (maybe 4mm)because it can withstand hail, etc. I can buy it for E15 per square meter(about $1,85 per square ft) and that is a reasonable price.
Regards , Chris
Here are some problems I ran into. Some cells do crack, but only where I glue them to the glass so they wont move around, or if I have a big bump in my solder. I have gotten pretty good now at laying the solder flat on the front, I have been using less solder, partly since the wires are tinned. I need better flux than I have, cleaning the flux off is what is breaking most of my cells. I still have to test the panel and measure the output. I’ll update, when I do.
The duct tape didn’t hold the vucuum to well. What I ended up doing is building a bag out of laminate and using an iron to seal the edges. I made the bag with the glass and solar cells already inside. I sealed all but a small opening in the bottom. I used a vacuum pump, you could actually use your carpet vacuum, and pulled a vacuum inside the bag. Once the air was removed from the glass, cells and laminate bag, I used a heatgun to seal the last small opening I left for the vacuum. If you seal the edges well, the bag will stay under vacuum and you can use a heatgun to melt the adhevise on the laminate to the glass and back of cells. I effectively made a sandwich of laminate, glass, solar cells, backing paper, and laminate. Having the laminate and glass for the sunlight to penetrate, I’m not sure of any issues that may yet develop from it. Having the laminate bonded to the glass will increase the strength of the glass, and if it breaks, should contain all the shards. I still have to do more testing, and any ideas are appreciated.
What I especially like is the extra protection of the layer of laminate in front of the glass : even if a crack would develop, then still there is the protection against moisture.That is : if the laminate is not damaged to much.
I do like your concept !
Question : What do you mean with the word “backing paper” .I understand it a bit, but how flexible or inflexible is it ? Or how thick ? What is your reason for using it ? Could you do without it ?
What is the cost of the industrial laminating sheet ?
I think you might have a very good concept Dingo !
Keep me posted or…..perhaps start a website ? Pictures and all…..
I bought a roll of 27″ x 100′ 10 mil(0.25mm) laminate from http://www.mybinding.com . $70.00 usd with shipping. I bought the standard low melt.
I’m not super pleased with the adhesive on the one I bought, maybe next time I will purchase a more expensive type of laminate. 100′ is enough for 10 panels though. Construction note, when you iron the edges together with everything inside, top and bottom laminate have to be square with eachother, or it will wrinkle when you pull it under vacuum.
The backing paper probably mostly ended up being for looks. I was hoping if any moisture was trapped inside it would remain within the paper, also it prevents you from being able to see through the cracks between the cells. I was tired of having to cut and piece things together, so I bought some 18″ wide painting drop paper. I only had to cut it to length. I did about 4 or 5 layers on the back. Also if I ever have to take it apart, the laminate will be stuck to the paper instead of the cells. I should be able to save more of them. I got the green one for latex and enamel, I thought dirty white paper would be ugly.
As you have pointed out on the glass, the reflectivity is killing my panel. I should have tried the low iron glass, but I already had my glass ordered before I read about it.
I’m thinking about putting everything together. I have two more panels to build, and I’ll take pictures along the way this time.
I wanted to say thank you also. Your articles was one of only a few out there I had to go off of, so thank you for that, and your ideas. When I finish I will try and do the same. The more information out there, maybe more people will give it a try.
Sean
Nice to hear you say that Dingo, thank you !
What I also very much like is that you do things (like the paper/moisture) for a reason, being right or wrong doesnt matter that much, it means you think things over. I do like that !
Hope you really can find the time to make those pictures of the building proces. It will make things much clearer. Hope you can put them on a website too ! And thanks for the link to the laminating stuff.
Regards , Chris
Maybe you can find some help by seeing this video…
http://www.youtube.com/watch?v=qYeynLy6pj8&eurl=http%3A%2F%2Fvideo%2Egoogle%2Ecom%2Fvideosearch%3Fhl%3Dcs%26q%3Dyoutube%26um%3D1%26ie%3DUTF%2D8%26ei%3DSS4NSseXKIOysAa47Nj7Bw%26sa%3DX%26oi&feature=player_embedded
Keep up good work!
Michael
sumi@post.sk
With the information here on this forum, your site and my own production experiences (also to see on my site http://hansmaas.come2me.nl) I’m convinced that my next generation panels will be as good as factory made solar panels and than for a nice price too.
Keep us updated regarding your experiences, I will continue experimenting with EVA sheet and will let you know how it’s going as when this is going to be a success we can start using only 1 sheet of glass which saves costs (so far I found that EVA sheet cheaper than glass).
My experiences and my net connected production you can still find on my site http://hansmaas.come2me.nl.
Dear Chris,
I salute you sir. you are an inspiration. and big ups to you D.R.Mason.
I WILL BUILD A SOLAR! I WILL BE PART OF THE SOLUTION!!
thank you both
rv
i dont give a rats a## about a warranty or anything else. i build my own panels for pennys on the dollar and some are 6 years old and still making full power with no issues.
costs me under $100.00 to build 65watt panels and takes me less than 3 hrs to do it plus, its fun.
Don –
I care about how long my panels last and the quality of the output. Maybe its just me, I don’t know.
If you live in a humid climate and your panels arent air tight, they won’t last very long. I have heard averages of around 3 years. Even at 6 years you would have to make panels 3 or 4 times to last as long as one commercial, or properly made panel. In the end your $100 comes to $300 or $400, and then you can easily buy a comercial panel for that price.
Besides the cells alone cost almost $100 so I doubt that figure of $100 is remotely accurate.
hi ive made a few panels which i think are really cheap and durable just use sikaflex 212 to seal glass and cover cells with silicone elastomer super water tight nothing can touch cells either all my panels make peak outputs.its only making a double glazed unit with cells in it?
u should use plexiglass as it can withstand hail and doesnt need to be replaced for a long time or never at all. 🙂
Isn’t there a better way to do this?
I’m going to go with solar, wind, and any other alternative energy I can. Good Job.
Just had a stroke or something but this is what happened.
If you make a frame and put in a sheet of 1/8″ steel about 6″ wider and longer than your panel lay in soft non Flammable cloth lay in your glass than cells than backing than EVA than A peace of carpet than 1/4″plat steel that covers the hole panel this gives pressure heat from the bottom with a space heater or whatever. looking for input before I try it.This could also be made into a box with a good seal on the lid than it is a vacuum chamber.the shop vac or you wife’s vacuum cleaner if you can get away with it. put in a valve so you can suck out all the air and close it
I have read a few people articles.
I’m new into making solar panels.
Can you all please write a simple step by step short procedure.
I can make the panel. ok
I don’t see anyone that can show us where to buy the frames
with the glass. completed . done
All i have to do is solder the cells and done.
Can you all just write short to the point , so we can learn
easy. Please send us legit website. not scams
Kepp up the good work
for a 36 cells 3x 6 .
Can someone send us the website wher we can buy it
this is a follow up…
Can someone send us websites where we can buy the complete
frame with glass.
I’m building 20 panel of 36cells 3×6″ I bought with your
help at fremont, cal. company. very nice people.
Now all we need is get the frame . 25 w x 31L x 7/8″
Please help me find the frame maker website.
thanks again,
Frank e-mail: : solarfloridaroofs@yahoo.com
i bought 1.75wp cells on ebay. used a piece of plywood and some ceramic tile spacers glued to the plywood only to make one straight line. i found most of the sells are just a bit different in size so i only made one line just to have the cell sit loose in line. ketp the cells straight while soldering 9 in a row. tested the output of the 9. then i placed my clear 5mm glass on the table. placed the 4 rows of 9 cells face down on the glass to made 4 rows. completed the final soldering of buses with cells face down. Used PV 804 to place a 2 in dia dot in the middle on the back which was not up of each cell. i then placed a 5mm clear placstic on the back with two holes pre-drilled where the two power leads needs to come out. extra PV 804 around these two holes too. pressed gentally and evenly to have all cells in uniform. like a sandwich flipped the whole thing over now and lifeted the top piece of glass off. i then placed a 1/2 inch continuous bead of PV 804 all the way around the outside edge about 3/4 to 1 inch in from the edge. placed the top piece of glass on top and pressed gentally all the edges to make sure i had a great seal. using alum trim the the glass companies use 12mm inside u chanel i then applied some PV 804 to the inside of the trim. with all corners mitered to 45, pushed the edging on and wiping off the excess pv 804 from the back and front surfaces. flipped it over and now applied more PV 804 to mount a J-box on the back and solder and trim the leads into the box.
my panel works great and here is my cost list.
$30 for 5mm glass plate 26×32, $50 for plastic 5mm, $18 alum trim, $15 pv 804, $20 odds and ends 36 cells at $2.30 ea for 1.75wp some shipping costs less than $240.00 63 watt 18v 3.5amps. i paid over $800 for 130watt panels plus shipping costs. i can build 2 of my panels to achieve the same watts for half the price. for a DIY type guy, not knowing the best places to buy stuff and get the best values. paying top dollar for all items. i know i still did a prety good job. quality of the product is the some of workmanship and materils. i’m not selling but i know it the materils do what they say i’m in good shape. not bad for a guy that never seen this stuff before and had no idea what i was getting into let a lone know what i was doing.
i am handy and there is a lot to this so be patient if you not handy. DO NOT RUSH any of thess processes. if your not electrically incline, make sure you seek some experiance from someone that has that back ground before connecting this stuff up. this is live voltage once the sun comes out.
i also forgot to mention that i did this in my family room over a period of two weeks. it also took me two weeks because i needed to lay out cells to get the best sizing. then i needed to soldier them together take some measurements add some spacing, call around get pricing and sizes, order the plastic and glass find time to pick it up while working, so hr here hr there. but i would have to say that now that i have made one, the next 5 i am going to make will not take as long. a guess would be 4 or 5 hrs per panel. lots of questions from my family as to how much longer will this take. i am in the middle of making my frame to mount my finish panels outside. the first one takes the longest because the next part depends on the first part.. once i have my outsdie mounting completed, then i will make the rest of my 5 more panels. no need to have glass products laying aournd unless you have a place to put them. like Frank F in the reply before my first entry, i will plan my outside to determine how many of these to actually make. now knowing the easy workable size of 36 cells, i now have my process. you will find yours.
when i say 5 hrs to make this does not include the time to drive around to pickup items that i ordered and the time on ebay and waiting for parts to arrive. once i have the stock pile of materials then if i just got up and started the project sat morning i would be done 1 panel just after lunch.
Hello Frank,
contact Everbright Solar In Fremont Calif. They are good people selling a very good price per watt. Here is the link : http://www.everbrightsolar.net/ . You will have to make the frame with the glass yourself. I have sofar not seen any place were they sell this. I myself use tempered glas and make the frame of aluminum.
Hello Darryl,
Good description of your building the panel. Now start looking for cheaper materials. I dont see any reason for not using glass for the backplate. Advantage is that ,if you look around long enough ,you can find the glass for free. You just need to cut it to the right size.Also it will expand and contract at the same rate as the frontplate when the temperature changes during day/night and summer/winter, that way not creating to much stress on the pv804.So it will last longer.
I now have gotten my order of tempered glass and I have about 100 square meters of it. I got it for a bit less than $20 per square meter. There are about 10.8 square feet in a sqm. So it means about $1,80 per square foot. But I have been searching for it for a few months also checking out other types of glass.This had the most economic price wereby I also considered the amount of sunlight it lets through. My glass is 88%.
Chris
Next week I will receive a last order and then I will start building 10 panels of 50Wp each. So a total of 500Wp. Then see how it holds during our wet/freezing winterseason. If it holds well I will continue to over 2000Wp.
Chris
@Chris – great article, your panels look tight. Mine would probably have duct-tape all over them =^)
@frank f – here are some reviews of the top step-by-step solar power guides that are out there now. A bunch of them even include videos too:
http://www.reviewsuncensored.info
I think that the one called “Green DIY Energy” looks the best, even though their website maybe looks a little less hyped-up than the other solar power guides out there.
Good Luck!
Jon
Hi, Chris
I am very impressed by your courage and i wish you the world in your expérimentation. I myself have been hookd up on the solar energy sector just 4 months ago and i have learn so much from it. Keep up with the good work and one day i will invite you to Africa where you can have your own signature, lead a business that could change the world cause I am down to learn as much as i can and then we could teach others how to make this world go green. I am dead serious by the way.
Good Job, Budd. Harouna
Thank You very much for your compliment !
Chris.
Hey Chris,good job but did want to warn some guys off the old evergreen cells.They are microcracked and will be producing power in 2-3 years at under a Watt.We have been warning people off but newer high efficiency and high watt cells are now hitting DIY due to the price wars in China,everyone is dropping prices to compete with them but weve had them in stock for about 4 months.New stuff is now on the market but really the reason all of our employees are now on the net is because of the guides mentioned above in an earlier post.
100% of them,all of them-earth4energy,the “comparison” sites,all the slick or non slick sites related to guides that are 6 months or newer are a scam.Google links and generalized info are all you get for 49.99.We are starting a campaign against them all over the place and you will start seeing alot more of us and alot less of them in the coming weeks.So for those looking for DIY solar guides or advice stay away from the newer stuff,it is general info that will not help you build successful panels and at all costs,dont use wood frames!It warps and even if you use sealant or marine plywood you have to reseal it every year!
Fiberglass or glass like Chris has used here is what you need to be using as a backing.
And Thanks,Chris,for promoting real DIY solar!
My friend and I have been brainstorming about how to make an airtight solar panel. We were thinking that we could create a metal frame and put plexiglass in the back of the frame. We would then place the panels on the plexi in the frame. We would then pour polyeurathane onto the cells and place lexan on the top and then let the polyeurathane dry.
My qyestions are:
Will the poly disrupt the charges on the solar cells?
Will the poly contract or expand enough in winter and summer to crack the solar cells?
Thankyou.
Congratulations on your build, I hope the panels serve you well and this article will hopefully encourage more readers to follow your example. Great detail included as well. The potential of solar power is so huge, people really could do so well from following your example.
Hello Liam,
I do not think that the poly wil have influence on the power generated by the cell (if that is what you mean by “disrupt the charges” ) but the sunlight will lose power when it penetrates the layer of poly. And that after it has also lost some power allready when penetrating the lexan.I would not know how much losses you get.The best thing to do(especially regarding the temperature/contractions/expansions) is to just go ahead and make a small panel (for instance 12 cells) and test it through the summer and winterconditions. Perhaps you can find a place were they have deep freezing-installations and put the panel in and out of there several times so you wont have to wait for winter…… I know someone who did it with a testpanel( made with glass/cells/PVB) small enough to put in his kitchen freezer.
In the meantime I have built 5 panels , 50 Watts each. They are not completely finished but the double-glass is finished,cells enclosed in it and I am working on the frames. But that is a less demanding job.For some pictures see my latest update on http://www.doctersnuggles.come2me.nl
Hello Liam,
I do not think that the poly will “disrupt” the charges on the solar cells. (I dont really understand what you mean by that…..) I dont think it will cause any problems with the cells but the only way to find out is to try it !
Use the freezer and put it in and out of there 10 times or more.
You also have to deal with the airpockets between the lexan and the poly as it will be very difficult to put the lexan onto the still fluid poly without trapping pockets of air.
One more thing is that the sunlight will have to travel through the lexan and the poly , which means 2 times oosing sunlight. Besides I have found out is that tempered glass is a lot cheaper than lexan……
i am intrested in making solar panel,i need deatials about solar..
Hello Rajesh,
I do not understand your question really. Most details are on my website, did you look there ? http://www.doctersnuggles.come2me.nl
if your frames are water tight try filling them with a clear (or mostly clear) oil. you loose 5% of your light at every glass surface due to reflection. the reflection occurs because of the abrupt change in refractive index between the glass and the air. if you fill the air gap between the glass and the panel with oil, I recommend canola or rapeseed, you eliminate one of these reflections.
if you are very brave you could even try mounting the cells directly to the glass using a clear silicon glue. though the thermal gradient may crack the panels or the glass.
if on the other hand you are very ambitious you could use a small pump to circulate the oil and use it in a combined heat solar application. in the Netherlands the temp would be just about right for heating your home. in fact you will probably get more energy from this than the cells.
Hello Evangeline,
I have been thinking about these suggestions, wondering if it is true about the abrupt refractive change. But now you confirm them. Thank you. I will try them sometime in the future. I wish there were more hours in a day…..
I believe that the energy future is solar. Not in that big dimension what we would need to run all things but enough to support every household with energy. But till it is so the price of the solar opanels has to fall.
hi..
did anyone try to laminate the cells with clear expoid resin? well, its not that i dont trust the laminated versions with the EVA sheets or with the PV804 silicone based stuff… its just that i could get lots of epoxid resin for free at my work… =)
i also think, epoxid resin would be cheaper price then both other versions, aslong as 10kgs of resin cost just about 60€, witch is alsmost the price for 1kg of the PV804 or similar stuff.