 Because I think that the price of a solar panel is still pretty high(in Europe), and because the stimulation from our government (in the Netherlands) is not so good (very,very complicated and time consuming) I started the project of building my own solar panel. I would like to invite anyone who has some experience with this or is interested in it ,to give me any advice or remarks about it. The main challenge is to build a panel that can withstand heat, cold, rain and hail for many years.
Buying My First Solar Cells
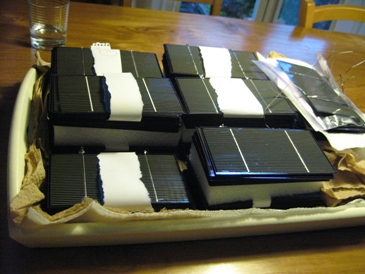
In October 2008 I bought my first 100 cells via Ebay. But as I later learned, they were still very expensive: 300 Euros for 100 cells, including shipping. I was told they should produce 1,98 Watt each. Below a picture :
After some experimenting and very long brainstorming about how to continue, I found another seller on Ebay who had the same cells (of which he gave the specification that they were 1,75 Wp each……) But these were slightly damaged. Well I decided to buy 500 cells ,a mix of 3 different qualities. The seller had not counted these cells but there were 620 cells, of which after a first selection , just over 500 were reasonably good. Not a bad deal to start with. And a lot cheaper! Also now I had over 100 cells for practice on soldering and handling.
Building the First Small Panel.
Well I got started. Beginning with the soldering-technique, that takes some practice, but after a while you get the hang of it. And now my first small experimental panel is ready! The main focus and moreover challenge is to get the cells 100% sealed: air and water tight. The cheapest solution for me is to make a double-glass construction. And the cells in between the 2 plates of glass. The panel is made of 12 cells, each 0.55 Volts. On the picture below you can see many purple coloured wires. Those wires are each connected in between each cell so afterwards I can still do some measurements to compare each separate cell.
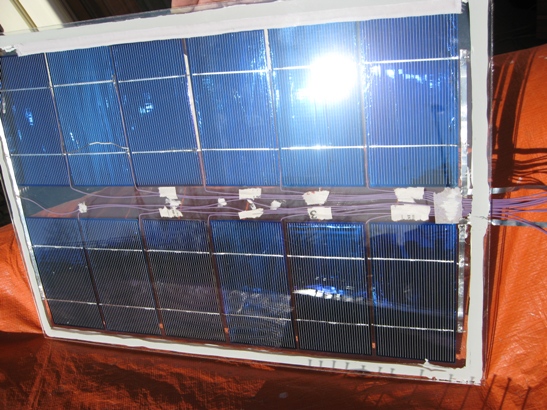
My First Do-it-yourself Solar Panel
The First Measurements in the Sun
I must say that at first I was worried whether I would see the cells really produce the power they should. But after building a variable resistance (making it possible for me to roughly find the maximum power point) the sun at last was shining (not much sunshine here beginning of February) and I got my first real measurement : 15,5 Watt. According to the specifications the panel should give a maximum of 12 x 1,75 W = 21 Wp. Given the fact that the glass takes away about 10% of the power,without the glass it would have been about 17 Watt. I expect that during summer as the sun rises much higher above the horizon, the measurement will give higher readings , thus coming closer to the specifications…. I am using normal 4 mm (0.16 inch) glass because it costs me nothing. If you just look around near places were they renovate old houses you can get the old glass for free…… This compared to the real stuff they use for solarpanels which is quite expensive and probably very difficult to find.
Influence of Heating the Panel in the Sun.
During the first measurements, I found that the heating up of the panel was pretty strong. But this especially was the case for the backside. were the cells are glued upon (using the same kit I used for glueing and sealing the panel). This panel is 12 mm (0.47 inch) thick : 2 plates of glass each 4 mm (0.16 inch) and 4 mm in between. What troubles me is the temperature-difference between the front and backplate of glass. This will result in different expansions creating stress on the sealing,if that is repeated too often it will start leaking. Now I am using the same kit as is being used in solar panel factories. But it still worries me. A solution can be to keep the panels small, so the difference in expansion stays minimal.
Improvements
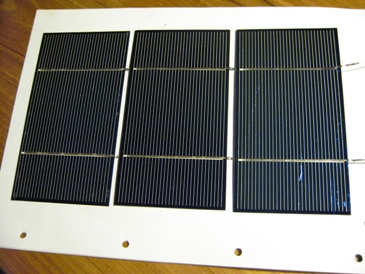
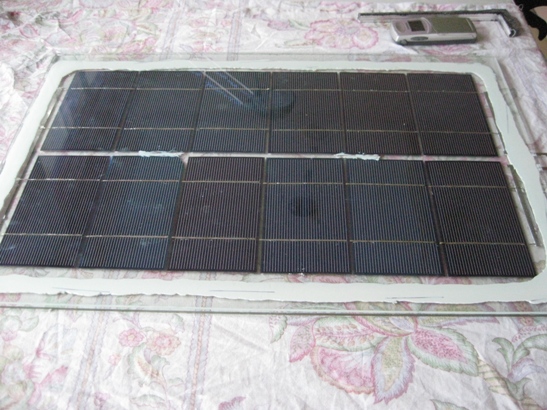
A solution to the temperature-problem can also be to make the gap between the 2 plates of glass smaller. So the heat will be more evenly dissipated to both the front and backside ( thereby also creating more cooling capacity). My next panel (picture below) is the same size,the difference is the distance between the 2 plates of glass : it is now 1.5 mm (0.059 inch) …..and this also makes the sealing a lot easier and thereby better. I have used pieces of copper winding wire that I happened to have : 1.2 mm (0.047 inch) thick. I took several pieces of about 3 cm and spread them evenly along the side on the glass backplate. Then the kit along them all around the full edge. And finally pressed the front plate on it. The result is a gap between the plates somewhere between 1.2 mm and 1.5 mm. So on the inside, there is some trapped air (with, of course, a certain amount of humidity in it), which can potentially cause condensation. But my hope is that the amount of that is so small (only very small amount of air……) that it will not be a factor…… ( In the first panel I did put some stuff that can “eat” the condensation. I got this out of old double glass that I separated,the stuff is inside the aluminium strips between the double glass edges)
The kit will have to dry for a few days, but anyhow the weather forecast does not indicate any sunshine the coming days………
First Results
Bottom line is that if the output of each cell really hits 1,75 Wp then I can come to a price of Euro 1,20 per Wp (or even lower than that….) And with such a price the panel will not have to last for 20 years……..but off course that is my aim ! That will be the main challenge ! But I must say with this second panel my hopes are getting higher.
You can find more (and more up to date) information on my website
Well, who feels like building panels also ? Or give me some advice, or share experience. I do not mind getting negative critics because they might be correct………and they are there to be solved !
Next Phase
Update: 15 februari 2010:
The first systeem of 400Wp is now fully functional and produced it’s first electricity. The cost price is now around $1.68 per Wp and is expected to drop to $1.10. More information about the next phase in the project can be read in the article DIY Built Solarpanel Installation Now Operational.



171 replies on “Building my own Solar Panel”
[…] If you lights can absorb enough sun during the day, choose a proper size will match your request. Solar heating panels come in a variety of configurations. One popular set-up is the flat plate…anels  Crucial Facts About Solar Panels Types …" style="width: 120px;float: right;clear: […]
[…] certain to get everything required to build your solar panels from start to … Video Rating: 4 / 5 This is part 2 and covers the basics for beginners + The cells I am using are all broken cells I pu…="425" height="355" […]
[…] others . And I really like what you are saying about the experience you have with your own Panels. Untill today I have not used diodes,simply because there is no need (yet) to parallel […]
And since you posted this, the prices of solar panels has decreased dramaticallly. Whether a person builds their own or buys them, the idea of free electricity has gazillions of advocates. In many place sin the world, it’s the only viable solution for electricity generation.
WOW just what I was looking for. Came here by searching for DIY solar panel guides
Good post! Build DIY solar panels is not difficult things but for newbie still need some good step-by-step instruction to help them build efficient solar panels.
Great post!
Excellent discussion.
Why not leave out the glass plate entirely?
Just laminate the cells between two layers of plastic.
I think it would withstand rain and some hail.
Did anyone try this (not using glass but laminates only?)
Thnx!
[…] Olino Article […]
Im having a hard time finding all the parts for my solar project locally.
In seeing this post is several years old, the comments are no longer valid. Solar panels have come down in price so far that it is actually cheaper to buy 200+ watt panels than it is to make them from scratch. As a hobbyist however, these are very fun to build and it’s very educational for the solar enthusiests. Stumbled!
[…] As part of every nomadic life it involves settling for a time here are a few things that might make it more enjoyable and allow you to live off the grid so why not get water from thin air with ecoblue or Build your own solar panel. […]
[…] van der Zwaal from OliNo Renewable Energy has been making low cost solar panels from smaller cells he picked up cheap on […]
[…] http://www.olino.org/articles/2009/03/19/zelfbouw-zonnepaneel (NL-talige versie) http://www.olino.org/us/articles/2009/03/19/building-my-own-solar-panel (idem, Engelstalige versie met extra commentaren) Chris was ook op de uitzending van 24 maart 2009 […]
[…] Building my own Solar Panel | OliNo – 163 Responses to “Building my own Solar Panel” HenkR Says: March 19th, 2009 at 4:48 am. Great job! Everybody could go solar, so why hesitate or burn the last …… […]
Solar power is a clean, renewable energy that many are taking advantage of. While it is a great alternative to fossil fuels, it can be confusing to know what solar panels you should use and where they should go.
Thank you!
I really like what you are saying about the experience you have with your own Panels.
Nice Post
Thanks for sharing this interesting blog with us. I am also a solar paneI cleaner and running a solar panel cleaning company in California called “Aqua Solar Cleaners”. Here we offer residential & commercial solar panel cleaning services with Semi-Annual, Quarterly, monthly options. You can also check out our website for more : https://www.aquasolarcleaners.com/
We have also mentioned some interesting strategies. Thanks!
One of the disadvantages of solar power is that it comes with a high initial cost of purchase and installation. This includes wiring, batteries, inverter, and solar panels. So I care offer solar financing options.
One of the disadvantages of solar power is that it comes with a high initial cost of purchase and installation. This includes wiring, batteries, inverter, and solar panels. So I care offer solar financing options.